- Get link
- X
- Other Apps
Acunetix Release Web Site Security Pen Testing Tools Free
HTTP editor, fuzzer and sniffer tools help pen testers identify vulnerabilities
London, UK – January 2016 – Hot on the release of Acunetix Version 11, pioneering web application security software Acunetix, now delivering Manual Pen Testing Tools at no cost. Penetration testers can make use of an HTTP Editor to modify or craft HTTP requests and analyze responses; intercept and modify HTTP traffic on the fly using the integrated HTTP Sniffer; fuzz test HTTP requests using the HTTP Fuzzer and test Blind SQL Injection vulnerabilities further using the Blind SQL Injector, among others.
“Acunetix has for the past decade been an excellent resource in the pentester’s tool kit. Prior to Acunetix v11, these Manual Pen Testing Tools were only available to Acunetix Customers. By releasing our manual tools separately, we aim to facilitate veteran testers as well as up and coming security researchers by making it easy to manually test web applications for logical flaws among others,” added Nicholas Sciberras, CTO, Acunetix.
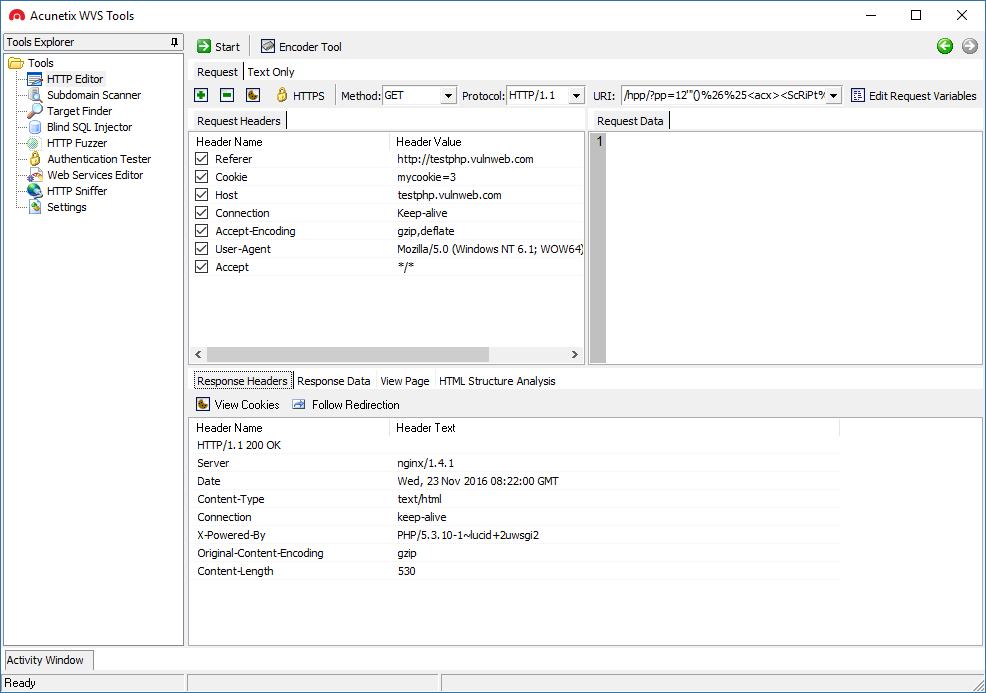
HTTP Editor: Allows you to create, analyze and edit client HTTP requests; as well as inspect server responses. It also includes an encoding and decoding tool to encode/decode text and URL’s to MD5 hashes, UTF-7 and other formats.
HTTP Sniffer: A proxy that allows you to analyze HTTP requests and responses, and edit these while they are in transit. The HTTP sniffer can also be used to manually crawl a site, and use the manual crawl to seed an Acunetix scan.
HTTP Fuzzer: A tool which allows you to automatically send a large number of HTTP requests including invalid, unexpected and random data to a website, to test input validation and handling of invalid data by the web application.
Blind SQL Injector: An automated database data exfiltration tool. By using Blind SQL injection vulnerabilities discovered when scanning a website, it is possible to demonstrate the serious impact a Blind SQL injection vulnerability can have on the website. Used to enumerate databases, tables, fields and dump data from the vulnerable web application.
Subdomain Scanner: Scans a top-level domain to discover subdomains configured in its hierarchy, by using the target domain’s DNS server, or any other DNS server specified by the user. While scanning, this tool will also automatically identify and inform the user if the domain being scanned is using some kind of wildcard characters, such as *.domain.com.
Target Finder: An IP range / port scanner which can be used to discover running web servers on a given IP or within a specified range of IPs. The list of ports on which the web servers are listening can also be configured. The default ports the scanner will scan are port 80 for HTTP and port 443 for SSL.
Authentication Tester: Used to test the strength of both usernames and passwords within HTTP and web forms authentication environments via a dictionary attack.
Download the FREE Manual Pen Testing Tools
About Acunetix
User-friendly and competitively priced, Acunetix leads the market in automatic web security testing technology that comprehensively scans and audits complex, authenticated, HTML5 and JavaScript-heavy websites among others. Acunetix detects over 3000 types of web application vulnerabilities and is the industry leader in detecting the largest variety of SQL injection and XSS vulnerabilities, including Out-of-band SQL injection and DOM-based XSS. Acunetix beats competing products in many areas; including speed, limiting false positives and the ability to access restricted areas with ease. Acunetix also has the most advanced detection of WordPress vulnerabilities and a wide range of management and regulatory reports including ISO 27001 and PCI compliance. Acunetix also includes integrated vulnerability management features to extend the enterprise’s ability to comprehensively manage, prioritise and control vulnerability threats. Acunetix is available on premises or as an online solution.
Acunetix, the company
Founded in 2004 to combat the alarming rise in web application attacks, Acunetix is the market leader, and a pioneer in automated web application security technology. Acunetix products and technologies are depended on globally by individual pen-testers and consultants all the way to large organizations. It is the tool of choice for many customers in the Government, Military, Educational, Telecommunications, Banking, Finance, and E-Commerce sectors, including many Fortune 500 companies, such as the Pentagon, Nike, Disney, Adobe and many more.
Related course: Photography for Beginners Cameras are complicated. I was frustrated with my first DSLR. I just couldn’t capture what I saw through my viewfinder. It took a ton of trial and error. When I managed to work it all out, I started taking some pretty spectacular images. In this post, I will share with you everything that I’ve learned from my mistakes. A black and white photo of four beginners photographers holding DSLR cameras Infographic As beginner photographers, we tend to be visual learners. And it’s my job to make beginning photography as easy as possible for you. So I thought to myself, “What better way to help beginner photographers learn how to use their cameras, than by creating an infographic?” And that’s exactly what I did. I collaborated with an illustrator friend of mine, and together we made these images. The following are something that will make understanding exposure, and how cameras work, a whole lot easier! Check out what we came up with below: An infographic showing the basic functions of a camera - beginners guide to photography Let’s dive into more depth… Exposure For those beginning photography, exposure is key to capturing a great image. Learning how exposure works will help you to take control of your camera and take better photos. Aperture, shutter speed, ISO are the elements that combine to create an exposure. As you’ll soon learn, these elements have an effect on more than just the exposure. They also cause alterations in depth of field, motion blur, and digital noise. Once you understand how each one works, you can start diving into manual mode. This is where you take control back from your camera. The exposure triangle is a great way to remember the three settings. When combined, they control the amount of light captured from any given scene. This will help you to understand that changing one setting will necessitate a change in the others. That is if you are photographing the same scene with the same exact lighting conditions. Read here for all the information you need on the exposure triangle. Diagram explaining the exposure triangle - iso, shutter speed and aperture Aperture Exposure happens in three steps. We will start with the aperture. This is the hole inside the lens, through which the light passes. It’s similar to the pupil of your eye: the wider the aperture, the more light is allowed in and vice versa. Simple? Not quite. As the aperture widens, the f/number gets lower and more light is allowed into the camera. This is great for low light but be aware that it’s going to make the depth of field very shallow – not ideal when taking landscapes. So there’s a bit of give and take and I go into full detail about that in this post. The aperture is the preferred setting to set first, as it directly influences how much of your scene is in focus. But, if you are looking to create motion blur, then it is second to the shutter speed. Exposure will be much easier if you can memorize the f/stop scale. The scale is as follows: f/1.4, f/2, f/2.8, f/4, f/5.6, f/8, f/11, f/16, f/22. Digram showing the the f/stop scale for better understanding of photography for beginners Shutter Speed Once the light has passed through the aperture of the lens, it reaches the shutter. Now you need to decide how much of that light you’re going to allow into the camera. Ordinarily, you only want a very small fraction of a second (for example 1/250) to prevent motion blur. However, different shutter speeds complement different situations. Anything from really fast (1/4000) for sports photography to really slow (30 seconds) for night photography. It all depends on what you’re shooting and how much light you have available to you. Knowing how your shutter speed works is a key element in the basics of photography. A conceptual portrait of a girl in her bedroom surrounded by flying books - ISO Once the light has passed through the aperture and been filtered by the shutter speed, it reaches the sensor. This is where we decide how to set the ISO. As you turn the ISO number up, you increase the exposure. But, at the same time, the image quality decreases. There will be more digital noise or “grain”. So you have to decide upon your priorities in terms of exposure vs grain. For example, I would reduce the image quality if it meant that I could prevent motion blur in my photo. There’s no possible way to fix that in post-production (yet, at least). Aa atmospheric shot of an underground tunnel - digital photography for beginners Exposure Summary Once you’ve understood aperture, shutter speed and ISO, you need to learn how each of these elements of exposure work together. For all those basics of photography, exposure is the most important. If you don’t have this down, composition and framing become a moot point in beginner photography. In this post, you will learn about the ‘stop’ based system for measuring exposure. But, more importantly, how to prioritize the aperture, shutter speed, and ISO for the best photo. Every time. The corridor of an abandoned building taken during an urban exploration photography trip Understanding Your Camera Metering Modes Digital photography for beginners can be confusing. Exposure isn’t as simple as learning about aperture, shutter speed, and ISO. You also have to learn about how your camera looks at light. Metering modes are there to tell your camera how you want it to look at a scene. The photo below was taken on spot metering mode but, if you were to take the same photo using evaluative mode, you would end up with a completely different exposure. This is also covered in my free video training. If you’re looking for an article that explains digital, including Canon, metering modes, here it is. Understanding this basic photography point may just be the key to understanding why your photos are coming out underexposed or overexposed. A pristine winter landscape scene - dslr photography for beginners Histograms The histogram shows you a mathematical review of an exposure after the photo has been taken. It essentially tells you how evenly exposed a photo is. LCD screens aren’t very good at showing you this information through their display of the image. This is because they are affected by the ambient lighting conditions you’re in and the brightness of the screen itself. That’s why the histogram is such a powerful tool to utilize in beginning photography correctly. Screenshot of a photography histogram Shooting Modes Full-Auto, Program, Aperture Priority, Shutter Speed Priority or Manual Mode. How do you work out which one you should be using? There’s also a lot of misconceptions about which mode to use under which conditions. On top of a lot of bias towards not using manual mode. When you understand what exactly each mode does, the one that will be suitable for your situation becomes a lot clearer. This is also covered in my free video training. Portrait of a man onstage during a performance, atmospheric purple light behind -understanding shooting modes for photography beginners Depth of Field When you’re shooting in low light, you invariably have to widen your aperture to allow enough light into the lens. But this has one rather a major side effect. A shallow depth of field. This can be used very creatively (often to excess) but it’s not the only possibility. There are many situations, such as landscapes, where you’ll want to be using a narrower aperture so that the whole scene remains in focus. This tutorial walks you through everything you need to know about choosing the right aperture (and therefore the depth of field) for the right situation. When it comes to covering all of the basics of photography, depth of field is very important. A person holding a dslr camera to take a street photo - beginner photography tips White Balance White balance is something I wish I’d learned more about much sooner than I did. I look back on some photos now and wonder what I was thinking. The white balance changes the color cast of the entire photo. It is responsible for the overall warmth. It can determine whether your photo appears blue or orange, cold or warm. Auto white balance doesn’t tend to do a particularly good job, particularly with tungsten light. The sooner you learn about this basic photography idea, the more accurate your photos will look. This is also covered in my free video training. Bright and colourful outdoor travel photography portrait, demonstrating use of contrasting colors for photography beginners Focal Length Have you ever wondered what the ‘mm’ on your lens actually means? Or why people use longer focal lengths for portraits? It’s all discussed in this tutorial. The focal length affects more than just the ‘zoom’. It also influences the perspective. I cover which focal length you would want to use in different situations. As well as their possible side effects. It’s a really worthy read and one of my favorite tutorials to date. A diagram explaining how focal length works Crop Factor A lot of you may not realize but, unless you spend about $2000 on your camera, you’re more than likely to be shooting on a crop sensor. This means that your sensor is much smaller than professional SLR cameras, essentially cropping your image. The crop factor has a range of effects on your photos. It creates a narrower viewing angle and will influence your lens purchases in the future. For those beginner photographers, research what lenses will help your field of photography first. A diagram showing how the crop factor works
Comments
Post a Comment
Tnx